Breadcrumbs
Breadcrumbs
iOS에서 키보드에 동적인 스크롤뷰 만들기
앱을 사용할 때 키보드에 의해 컨텐츠가 가려질 경우 사용자에게 답답함을 줄 수 있습니다. 배경을 터치했을 때 키보드가 숨겨지는 기능으로 충분할 수도 있겠지만, 키보드가 올라왔을 때도 사용자가 모든 컨텐츠를 볼 수 있도록 화면을 스크롤할 수 있는 옵션도 제공하는 편이 좋습니다. 키보드가 없을 땐 스크롤이 되지 않고, 키보드가 올라왔을 때 컨텐츠를 스크롤할 수 있도록 만드는 방법을 정리합니다.
Scroll View 및 Container View 설정하기
먼저 기본 뷰에 스크롤뷰, 스크롤 뷰 위에 나머지 컨트롤들이 올라갈 컨테이너 뷰를 추가합니다.
ViewController에서 스크롤뷰를 하나 만들고, Safe Area에 채워지도록 설정합니다.
private let scrollView: UIScrollView = {
    let view = UIScrollView()
    return view
}()

override func viewDidLoad() {
    super.viewDidLoad()

    let safeArea = view.safeAreaLayoutGuide

    view.addSubview(scrollView)

    scrollView.translatesAutoresizingMaskIntoConstraints = false
    scrollView.topAnchor.constraint(equalTo: safeArea.topAnchor).isActive = true
    scrollView.bottomAnchor.constraint(equalTo: safeArea.bottomAnchor).isActive = true
    scrollView.leadingAnchor.constraint(equalTo: safeArea.leadingAnchor).isActive = true
    scrollView.trailingAnchor.constraint(equalTo: safeArea.trailingAnchor).isActive = true
}
스크롤뷰 위에 여러가지 뷰나 컨트롤들이 올라갈 컨테이너 뷰를 하나 추가합니다.
private let containerView: UIView = {
    let view = UIView()
    return view
}()
컨테이너 뷰를 스크롤 뷰에 채워지도록 설정합니다.
scrollView.addSubview(containerView)

containerView.translatesAutoresizingMaskIntoConstraints = false
containerView.topAnchor.constraint(equalTo: scrollView.topAnchor).isActive = true
containerView.bottomAnchor.constraint(equalTo: scrollView.bottomAnchor).isActive = true
containerView.leadingAnchor.constraint(equalTo: scrollView.leadingAnchor).isActive = true
containerView.trailingAnchor.constraint(equalTo: scrollView.trailingAnchor).isActive = true
세로 스크롤이 가능하도록 하기 위해서 컨테이너 뷰의 너비는 스크롤뷰와 같도록 설정하고, 높이는 같지만 우선순위는 required가 아니도록 설정합니다.
containerView.widthAnchor.constraint(equalTo: scrollView.widthAnchor).isActive = true
let heightAnchor = containerView.heightAnchor.constraint(equalTo: scrollView.heightAnchor)
heightAnchor.priority = .defaultHigh
heightAnchor.isActive = true
Text View 추가하기
텍스트를 입력할 수 있는 간단한 컨텐츠를 구현하기 위해 Text View를 3개 추가합니다.
private let textView1: UITextView = {
    let view = UITextView()
    return view
}()

private let textView2: UITextView = {
    let view = UITextView()
    return view
}()

private let textView3: UITextView = {
    let view = UITextView()
    return view
}()
텍스트뷰들에 대한 레이아웃을 설정하고 간단히 색을 추가합니다.
containerView.addSubview(textView1)
containerView.addSubview(textView2)
containerView.addSubview(textView3)

textView1.translatesAutoresizingMaskIntoConstraints = false
textView1.topAnchor.constraint(equalTo: containerView.topAnchor, constant: 16).isActive = true
textView1.leadingAnchor.constraint(equalTo: containerView.leadingAnchor, constant: 16).isActive = true
textView1.trailingAnchor.constraint(equalTo: containerView.trailingAnchor, constant: -16).isActive = true
textView1.backgroundColor = UIColor.FlatColor.Green.ChateauGreen

textView2.translatesAutoresizingMaskIntoConstraints = false
textView2.topAnchor.constraint(equalTo: textView1.bottomAnchor, constant: 16).isActive = true
textView2.leadingAnchor.constraint(equalTo: textView1.leadingAnchor).isActive = true
textView2.trailingAnchor.constraint(equalTo: textView1.trailingAnchor).isActive = true
textView2.backgroundColor = UIColor.FlatColor.Yellow.Turbo

textView3.translatesAutoresizingMaskIntoConstraints = false
textView3.topAnchor.constraint(equalTo: textView2.bottomAnchor, constant: 16).isActive = true
textView3.leadingAnchor.constraint(equalTo: textView1.leadingAnchor).isActive = true
textView3.trailingAnchor.constraint(equalTo: textView1.trailingAnchor).isActive = true
textView3.bottomAnchor.constraint(equalTo: containerView.bottomAnchor).isActive = true
textView3.backgroundColor = UIColor.FlatColor.Blue.Mariner

textView1.heightAnchor.constraint(equalTo: textView2.heightAnchor).isActive = true
textView2.heightAnchor.constraint(equalTo: textView3.heightAnchor).isActive = true
텍스트뷰들의 높이는 모두 같게 설정하고, 컨테이너뷰에서 16포인트씩 떨어지도록 설정합니다.
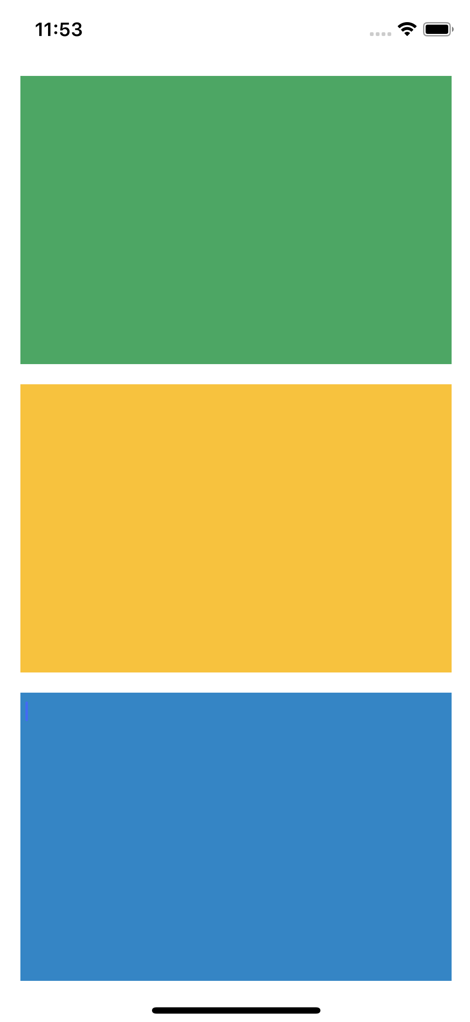
지금까지의 결과는 다음과 같습니다.
Notificaton Center를 통해 키보드 알림 받기
앱에서 키보드가 보여지거나 숨겨질 때 발생되는 이벤트를 받기 위해서 NotificationCenter의 addObserver 메서드를 이용할 수 있습니다.
// Register Keyboard notifications
NotificationCenter.default.addObserver(
    self,
    selector: #selector(keyboardWillShow),
    name: UIResponder.keyboardWillShowNotification,
    object: nil)
NotificationCenter.default.addObserver(
    self,
    selector: #selector(keyboardWillHide),
    name: UIResponder.keyboardWillHideNotification,
    object: nil)
keyboardWillShowNotification과 keyboardWillHideNotification이 발생하면 각각 keyboardWillShow와 keyboardWillHide를 호출하게 됩니다.
iOS 9.0 이후부터는 추가적으로 observer를 등록 해제하는 작업을 하지 않아도 됩니다. 타겟 버전이 그 아래라면, View Controller의 deinit 등에서 removeObserver를 이용하여 observer를 해제해 줘야 합니다. - developer.apple.com
keyboardWillShow 메서드에서는 userInfo 딕셔너리에서 특정 키값을 이용해서 키보드 사이즈 정보를 알아내고, 이를 이용하여 스크롤뷰 설정을 수정합니다.
@objc private func keyboardWillShow(_ notification: Notification) {
    guard let userInfo = notification.userInfo,
        let keyboardFrame = userInfo[UIResponder.keyboardFrameEndUserInfoKey] as? CGRect else {
            return
    }

    let contentInset = UIEdgeInsets(
        top: 0.0,
        left: 0.0,
        bottom: keyboardFrame.size.height,
        right: 0.0)
    scrollView.contentInset = contentInset
    scrollView.scrollIndicatorInsets = contentInset
}
userInfo 딕셔너리는 notification을 받는 객체가 사용할 수 있는 추가적인 정보를 포함하고 있습니다. 이 정보는 notification을 보내는 객체가 notification을 보낼 때, 받는 쪽에서 활용할 수 있는 객체를 이 user information 딕셔너리에 포함시켜 보내게 됩니다. 현재 키보드에 대한 notification을 받겠다고 했으므로 userInfo 딕셔너리에는 UIKeyboardFrameBeginUserInfoKey, UIKeyboardFrameEndUserInfoKey, UIKeyboardAnimationDurationUserInfoKey, UIKeyboardAnimationCurveUserInfoKey등을 이용해 가져올 수 있는 키보드에 대한 정보들이 들어 있습니다.
애플 문서에 따르면, 키보드의 위치 및 사이즈 정보를 알 수 있는 키에는 UIKeyboardFrameBeginUserInfoKey와 UIKeyboardFrameEndUserInfoKey가 있습니다. 앱을 사용할 때 텍스트를 입력할 수 있는 컨트롤을 터치하면 키보드가 올라오는데, 이 때 애니메이션이 사용됩니다. UIKeyboardFrameBeginUserInfoKey는 애니메이션의 시작 시점에서의 키보드 위치와 사이즈를 나타내고, UIKeyboardFrameEndUserInfoKey는 애니메이션이 끝나는 시점에서의 키보드의 위치와 사이즈를 나타냅니다. 애니메이션이 완료된 시점에서의 키보드를 기준으로 스크롤뷰를 조정해야 하므로 end frame을 이용해야 합니다.
UIKeyboardFrameBeginUserInfoKey를 이용하면 애니메이션이 끝난 후의 키보드 높이보다 약간 작은 값이 나오며, 이 값을 이용할 경우 스크롤뷰의 인셋을 조정하여도 컨텐츠의 일부가 키보드에 가려질 수 있습니다.나머지 두개의 키인 UIKeyboardAnimationDurationUserInfoKey, UIKeyboardAnimationCurveUserInfoKey를 이용해 각각 키보드가 올라오거나 내려가는 애니메이션의 duration과, 애니메이션 커브에 대한 정보를 가져올 수 있으며, 이것들을 이용해 키보드 애니메이션과 싱크가 맞는 커스텀 애니메이션을 만들 수 있습니다.
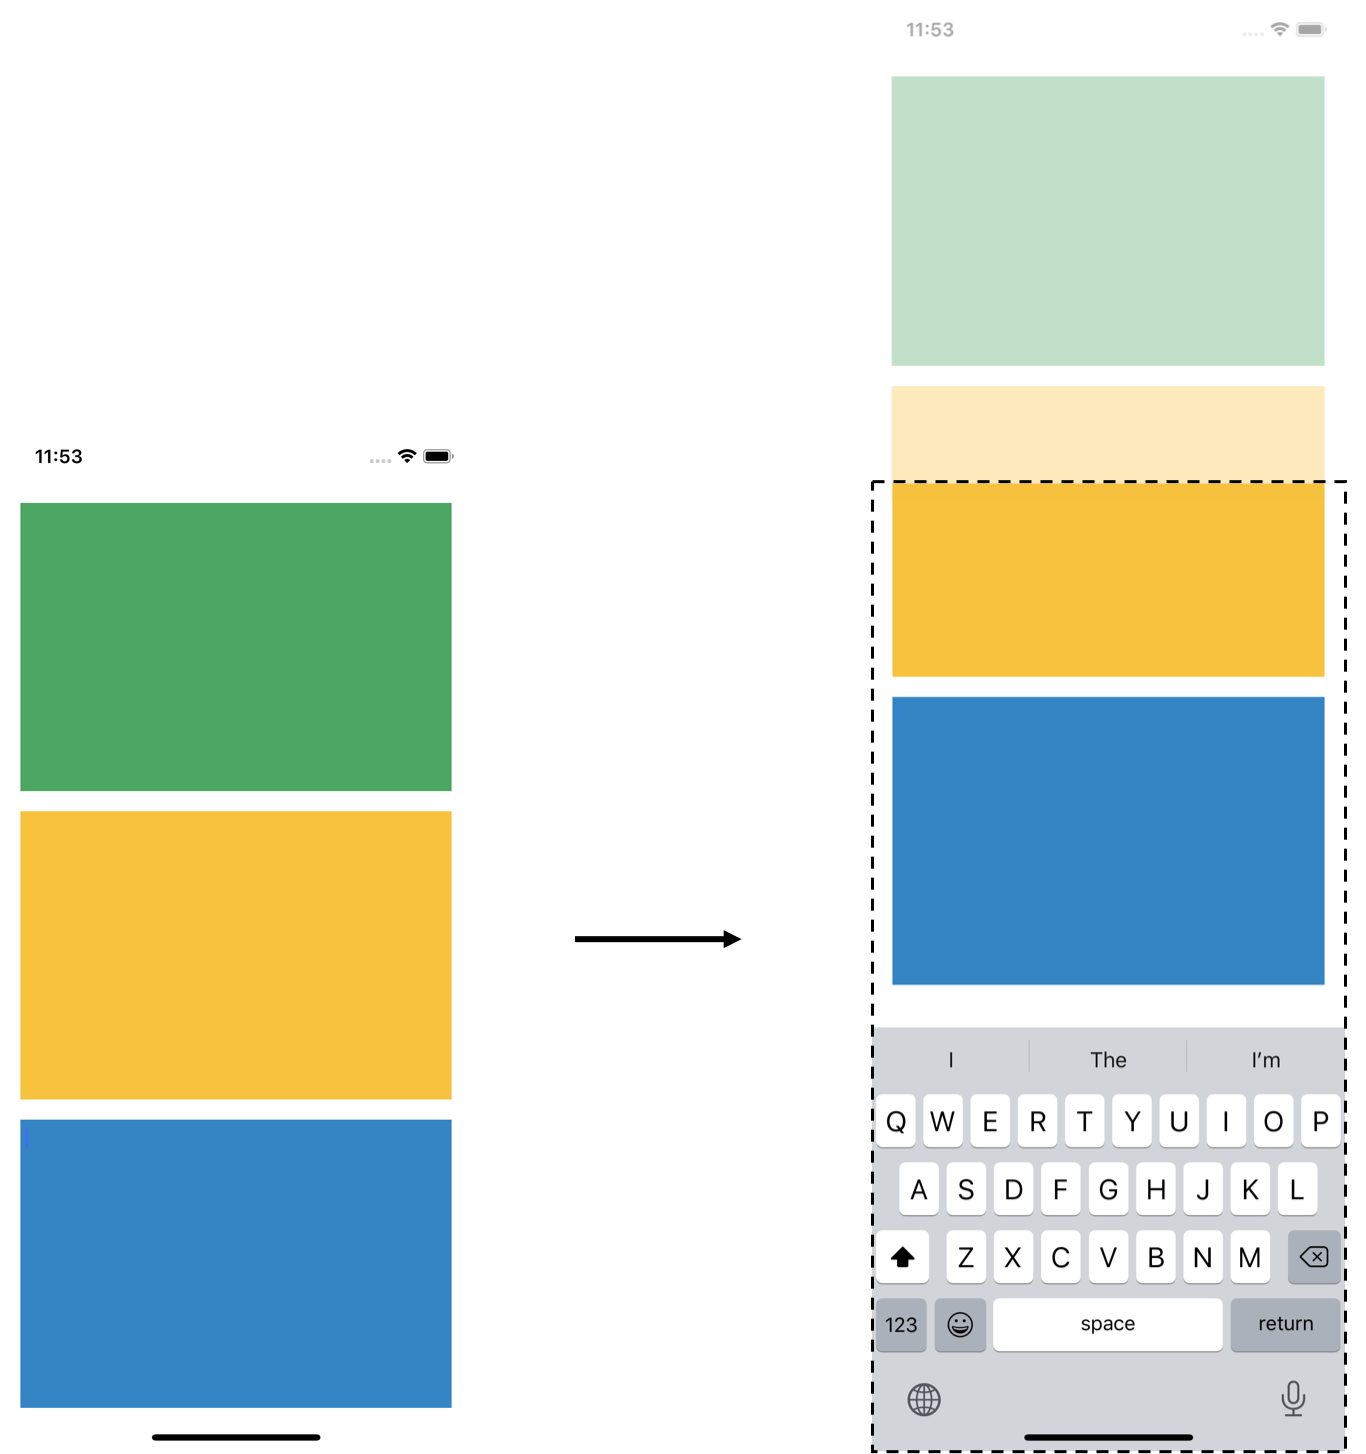
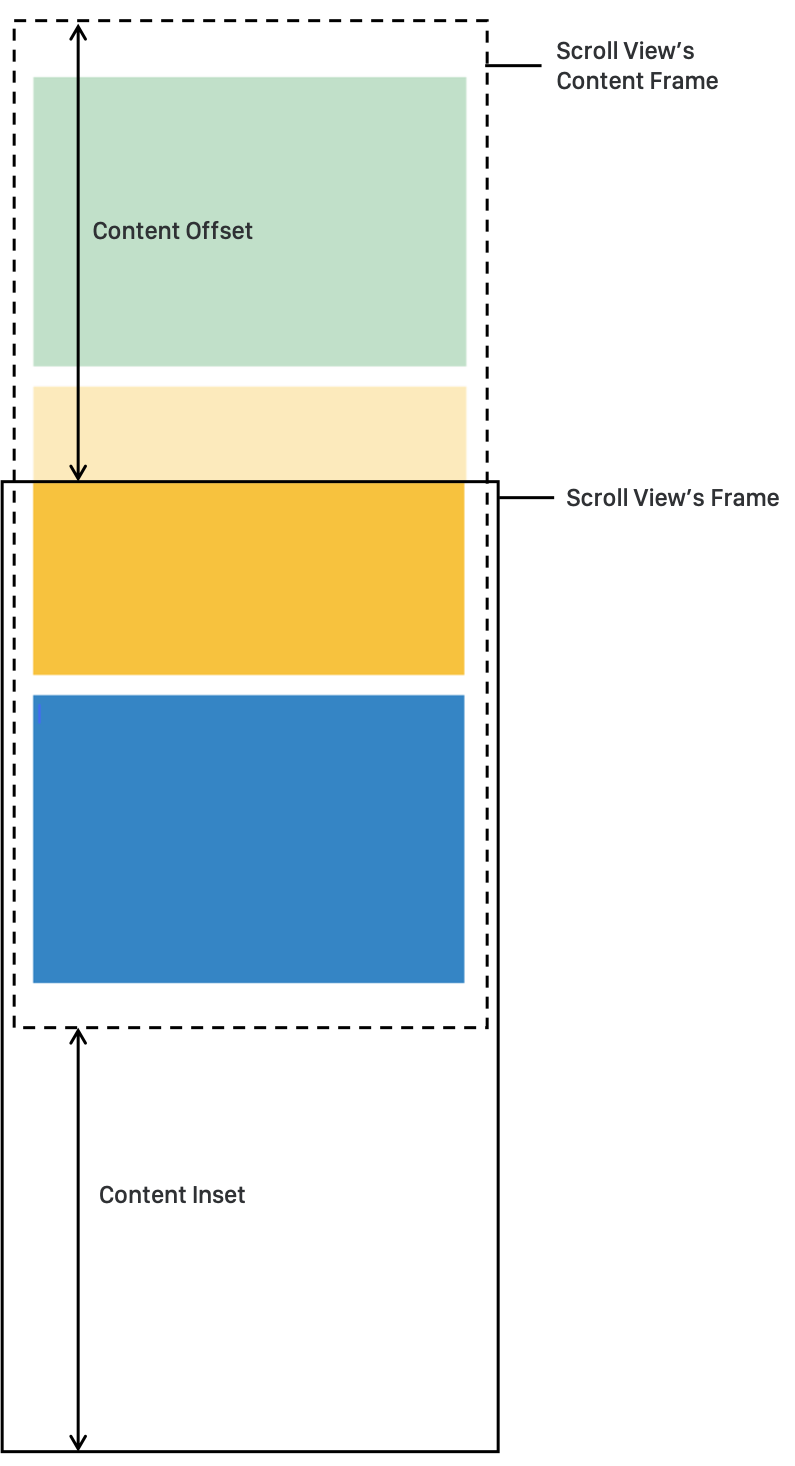
키보드의 높이는 size의 height 프로퍼티에서 가져올 수 있습니다. 이 값을 스크롤뷰의 bottom content inset으로 주었습니다. content inset은 스크롤뷰의 edge로부터 content view 사이에 추가 공간을 주는 것이며, positive 값일 경우 이 inset 공간이 스크롤뷰 안쪽으로 들어올 수 있습니다.
다음 그림처럼 content inset만큼 아래쪽 공간이 더 생겨나서 디바이스의 화면인 스크롤뷰 안으로 들어오고, 그 빈 공간에 키보드가 위치하게 됩니다. scroll indicator에도 마찬가지로 inset을 주었습니다.
추가적으로, 다음과 같이 현재 입력하려고 하는 Text View를 알아내어 화면에 잘 보이도록 스크롤을 적절히 조절할 수도 있습니다. 입력 시점의 first responder를 알아내는 방법은 여기를 참고하였습니다.
@objc private func keyboardWillShow(_ notification: Notification) {
    guard let userInfo = notification.userInfo,
        let keyboardFrame = userInfo[UIResponder.keyboardFrameEndUserInfoKey] as? CGRect else {
            return
    }

    scrollView.contentInset.bottom = keyboardFrame.size.height

    let firstResponder = UIResponder.currentFirstResponder

    if let textView = firstResponder as? UITextView {
        scrollView.scrollRectToVisible(textView.frame, animated: true)
    }
}
키보드가 사라질 땐 화면을 원래 상태로 복구해 놓아야 합니다.
@objc private func keyboardWillHide() {
    let contentInset = UIEdgeInsets.zero
    scrollView.contentInset = contentInset
    scrollView.scrollIndicatorInsets = contentInset
}
마무리
이상 키보드 유무에 대응하여 컨텐츠를 동적으로 조절하는 스크롤뷰를 구현하는 방법에 대해 정리해보았습니다.
전체 소스를 이곳의 DynamicScroll 프로젝트에서 확인 가능합니다.
tags: iOS - swift - UIKit